Backup projects in DaVinci Resolve 18
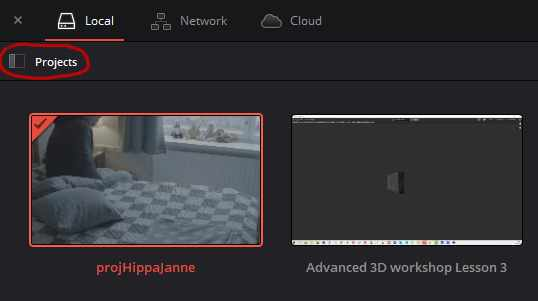
Click on this button in the project manager:
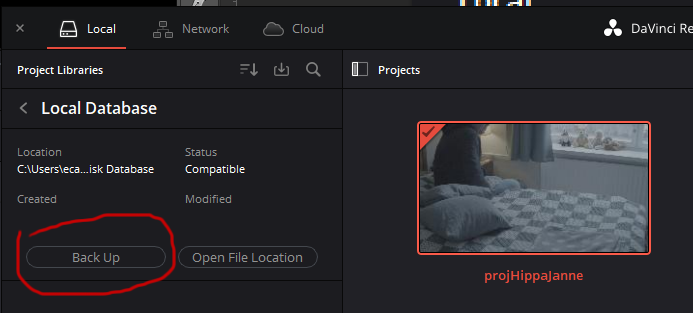
Click on the i-button:
Click on the backup button:
Transcribe interview audio for free and import it as text to DaVinci Resolve
Five DaVinci Resolve Tips to Boost Your Productivity
- Drag and drop folders of footage into Resolve with their folder structures intact. No more creating bins in Resolve for your various footage items. The solution is to drag and drop the folder from your operating system on the area which says “Master” which is typically on the left side of the Media pool. This will automatically preserve all your folder structures.
- Auto sync audio and video files. Many professional video productions will involve separate audio files from the video. Typically you have a low quality audio track embedded to the video coming from the video camera’s microphone and then you have a high quality set of audio files recorded with a boom or lavalier. When you start to edit such a setup in Resolve, one of the first steps is to sync the high quality audio with the video. To do that, simply select both the audio and the video clips (or even just the bins containing the audio and the bins containing the video) in the media pool and right click and choose “Auto Sync Audio”. From there I prefer the “Based on waveform and append tracks” because it will keep also the original audio in place for some sanity checks. It might take a while to complete and then it will give you a summary of the results. If you closed the summary, don’t worry, you can easily see which clips were synced with the audio by looking at them on the timeline. The ones that were successfully synced, will contain two audio tracks instead of just one.
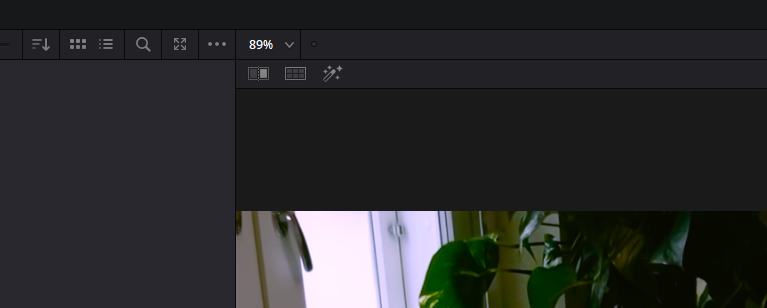
- Use the 3D qualifier for great results when doing secondary color grading. You can find it in the qualifier tab. Then just draw a stroke over the colors you want to isolate for grading. View the matte from the magic wand looking symbol above the video monitor.
4. Temporarily disable/enable snapping mid-operation with the N-key. When you are dragging a clip on the timeline and realize that the snapping preference is not working for you, you can press N to temporarily diasable or enable snapping.
5. Automatically name your exported video using the project name. If you typically export your video files from the render queue using the name of the actual project, it may be a bit annoying to type in the File Name field, since you have already typed it once when naming the project. It would be nice if Resolve could automatically suggest the project name as the export name, but in the meanwhile you can type %Project Name in the field and then hit “Add to Render Queue” to get the same result. There are other variables you can access as well like %Timeline Name and %Render Resolution. The easiest way to access the variables in to just type a % in the field and Resolve will suggest all kinds of possible variables to you. It’s enough to just type %Proj and then hit enter in order to get the Project Name variable.
How to do 3D-projection mapping with Blender
Full screen preview for second monitor in DaVinci Resolve
Most video editors have at least two monitors these days. If you want to see the footage your editing fullscreen on your second monitor while having the timeline and the rest of the panels on the other monitor, here are the steps for doing that (Edit: note that this feature requires the Studio version of Resolve):
- Make sure Workspace->dual screen is set to “off” (I know, sounds a bit counter-intuitive)
- Go to Workspace->video clean feed and select your monitor from there.
DaVinci Resolve is killing Premiere Pro
I usually don’t post opinion pieces about software, but this time I just can’t help myself.
I have been an Adobe Premiere user since 2004. I own CS3 Master Collection, CS4 Creative suite and CS6 Master Collection. I have been using CC at work.
I was not happy when Adobe forced everyone into a subscription model. It was good for new users though as they had a lower bar to entry. But for us long time users it was not a good move. Many of us expressed skepticism if Adobe would still be motivated to innovate new features for programs like Premiere and After Effects now that they would get our paychecks regardless. I think that skepticism has been proven right over the years.
I think we users can sympathize with software development being complex, difficult and time consuming. So we forgive a lot even when we only see cosmetic features after years and years of waiting. But then DaVinci Resolve steps up and shows everyone how rapidly a piece of software can actually be developed.
It was not that long ago that Resolve 16 was released with an amazing list of new features. And many of them big features, like the Cut page, adjustment clips, the neural engine for AI goodness, object removal etc. So I was not expecting to see as big of a release as Resolve 17 so soon. But here it is, filled with even more AI-based tools like the magic mask, massive Fairlight updates like improved architecture, automatic beat and word detection, new proxy workflows and render in place, new in-timeline chroma keyer, scene cut detection and 90+ smaller features.
I’m not sure if I have ever seen so quick software development, maybe excluding Blender. With speed like this one might expect tons of bugs and crashing, but so far Resolve 17 has been rock solid on my computer.
DaVinci Resolve just starts to seem like an absolute no-brainer at this point. It has editing, VFX-compositing (via Fusion), color grading and audio editing (Fairlight) all in one package. And it’s completely free to use for most purposes. But if you want all the goodness that is available including the neural engine, even then the cost of a perpetual license is only around $300. At the moment you can even get the Speed Editor keyboard thrown in the bundle for free. Now get this: not only is the license perpetual (yours forever), but you will even get free upgrades.
Boy is it nice to see competition like this against Adobe CC! I think we will see people jumping the Adobe ship in masses.
Blender Video Editor Tips
Blender, being the Swiss-army-knife -tool that it is, can also do video editing. Setting up a video editing layout is easier than ever with the new “Workspace” -system of Blender. Simply click on the + button at the end of the workspace tabs and choose Video Editing –> Video Editing. Here’s a picture:

When using Blender as a video editor, a couple of questions immediately come to mind:
- How do I perform a cut? Answer: Simply press K.
- How do I perform a ripple delete (an edit in which the gap of the deleted content is automatically closed)? Answer: There is no ripple edit feature at the moment, but it can still be done very quickly by hitting “Del” to delete, then “Page up” to jump the playhead to the previous cut and finally “Backspace” to “Close gap”.
- How can I “render the timeline” for better playback performance? Answer: The best way might be to create Proxies. In the Proxy workflow, Blender will create new, better performing versions of your video files and use them for better work speed. These are the steps you need to take to enable Proxies in Blender Video Editor:
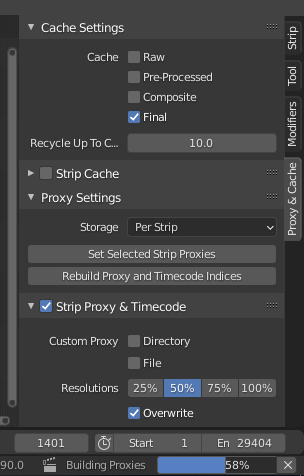
First find the Proxy Panel. It lives usually on the right side of the Sequencer (timeline looking panel). Select the clips you want to create a proxy for in the sequence. Click on “Set selected strip proxies” to set these clips up for proxy creation. It will ask for a desired proxy resolution. Then click “Rebuild Proxy and Timecode Indices”. Blender should now start creating the proxy files, next to your original files (although this location can be changed in the settings). It might take a while, but after it’s done, your playback should be much better.
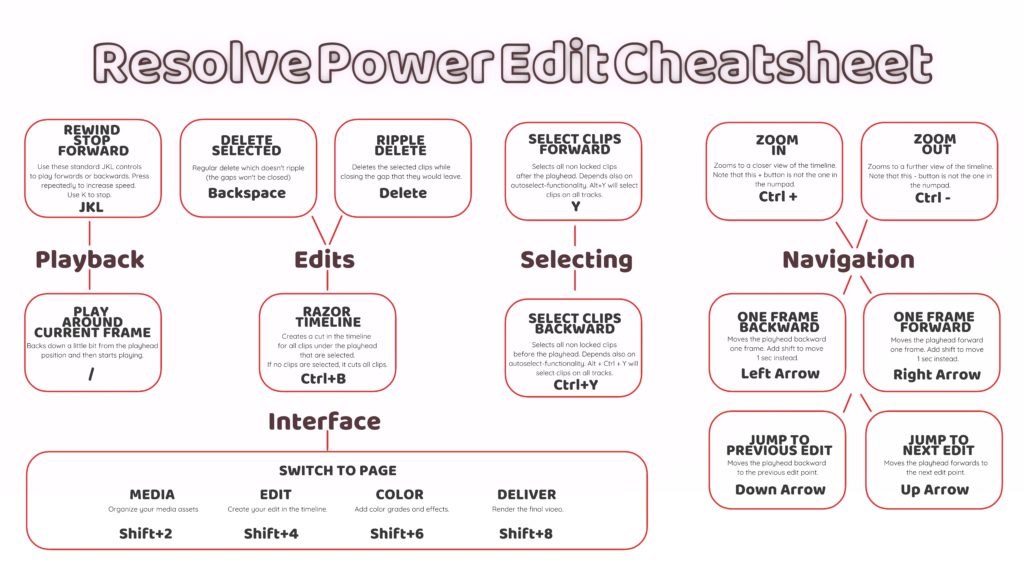
DaVinci Resolve Power Edit Cheat Sheet
Dealing with a multiresolution .mov file
For the first time in my career I encountered a video file that had two different resolutions. The beginning of the video was SD resolution and after 15 frames it jumped to a resolution of 1080p. VLC player was able to correctly switch the resolution during playback and it displayed the two different resolutions also in the codec information window. But Premiere Pro didn’t understand the file properly and never switched to the higher resolution portion of it. That was a problem because I wanted to use the high resolution in my edit.
Continue reading “Dealing with a multiresolution .mov file”

