Render a folder full of STL files to PNG images

I wanted to create images out of all the STL-files I had 3D-printed so far. Here is a script that automates the process using Blender.

import bpy
import os
import math
from bpy_extras.object_utils import world_to_camera_view

def clear_scene():
    bpy.ops.object.select_all(action='SELECT')
    bpy.ops.object.delete()

def setup_camera_light():
    bpy.ops.object.camera_add(location=(0, -10, 5))
    camera = bpy.context.active_object
    camera.rotation_euler = (1.0, 0, 0)
    bpy.context.scene.camera = camera

    bpy.ops.object.light_add(type='SUN', align='WORLD', location=(0, 0, 10))
    light = bpy.context.active_object
    light.rotation_euler = (1.0, 0, 0)

def create_red_material():
    red_material = bpy.data.materials.new(name="RedMaterial")
    red_material.use_nodes = True
    red_material.node_tree.nodes["Principled BSDF"].inputs["Base Color"].default_value = (1, 0, 0, 1)
    return red_material


from mathutils import Vector

def set_camera_position(camera, obj):
    bound_box = obj.bound_box
    min_x, max_x = min(v[0] for v in bound_box), max(v[0] for v in bound_box)
    min_y, max_y = min(v[1] for v in bound_box), max(v[1] for v in bound_box)
    min_z, max_z = min(v[2] for v in bound_box), max(v[2] for v in bound_box)
    
    # Calculate object dimensions
    width = max_x - min_x
    height = max_y - min_y
    depth = max_z - min_z

    # Calculate object center
    center_x = min_x + (width / 2)
    center_y = min_y + (height / 2)
    center_z = min_z + (depth / 2)

    # Calculate distance from camera to object center
    distance = max(width, height, depth) * 2.5  # Increase the multiplier from 2 to 2.5

    # Set camera location and rotation
    camera.location = (center_x, center_y - distance, center_z + (distance / 2))
    camera.rotation_euler = (math.radians(60), 0, 0)


def import_stl_and_render(input_path, output_path):
    clear_scene()
    setup_camera_light()

    bpy.ops.import_mesh.stl(filepath=input_path)
    obj = bpy.context.selected_objects[0]

    # Set camera position based on object bounding box
    camera = bpy.context.scene.objects['Camera']
    set_camera_position(camera, obj)
    
    # Apply red material to the object
    red_material = create_red_material()
    if len(obj.data.materials) == 0:
        obj.data.materials.append(red_material)
    else:
        obj.data.materials[0] = red_material

    # Set render settings
    bpy.context.scene.render.image_settings.file_format = 'PNG'
    bpy.context.scene.render.filepath = output_path
    bpy.ops.render.render(write_still=True)
    
     # Set transparent background
    bpy.context.scene.render.film_transparent = True

    # Set render settings
    bpy.context.scene.render.image_settings.file_format = 'PNG'
    bpy.context.scene.render.filepath = output_path
    bpy.ops.render.render(write_still=True)

def render_stl_images(input_folder, output_folder):
    for root, _, files in os.walk(input_folder):
        for file in files:
            if file.lower().endswith(".stl"):
                input_path = os.path.join(root, file)
                output_file = os.path.splitext(file)[0] + ".png"
                output_path = os.path.join(output_folder, output_file)

                import_stl_and_render(input_path, output_path)

if __name__ == "__main__":

    if __name__ == "__main__":
        input_folder = "3D Prints"
        output_folder = "/outputSTL"

    if not os.path.exists(output_folder):
        os.makedirs(output_folder)

    try:
        render_stl_images(input_folder, output_folder)
    except Exception as e:
        print(f"Error: {e}")

How to use:

Save the script in a python file. You can call it for example renderSTL.py. Change the input and output folders in the script to fit your situation.

Make sure you have Blender in PATH so that you can run it by simply typing “Blender” in a command prompt. If you don’t have it in PATH, open “enviroments variables” and edit the “PATH” variable under “system”. Add the path to your Blender installation as a new path.

Open up a command line in the folder which has the proper path to your STL root folder and paste this command in:
blender –background –factory-startup –python renderSTL.py

Blender should now render images out of all your STL files in the background and save them into the output folder.

Anyone can try NeRF now with a free app!

The 3D industry has been buzzing about Nvidia’s Instant NeRF (which stands for neural radiance fields) ever since they published their first demo video.

This technology has since been in rapid development and we now have a free iPhone app called Luma AI that anyone can use to capture NeRFs.

I tested the app with a toy robot, here’s a automatically generated video of the result:

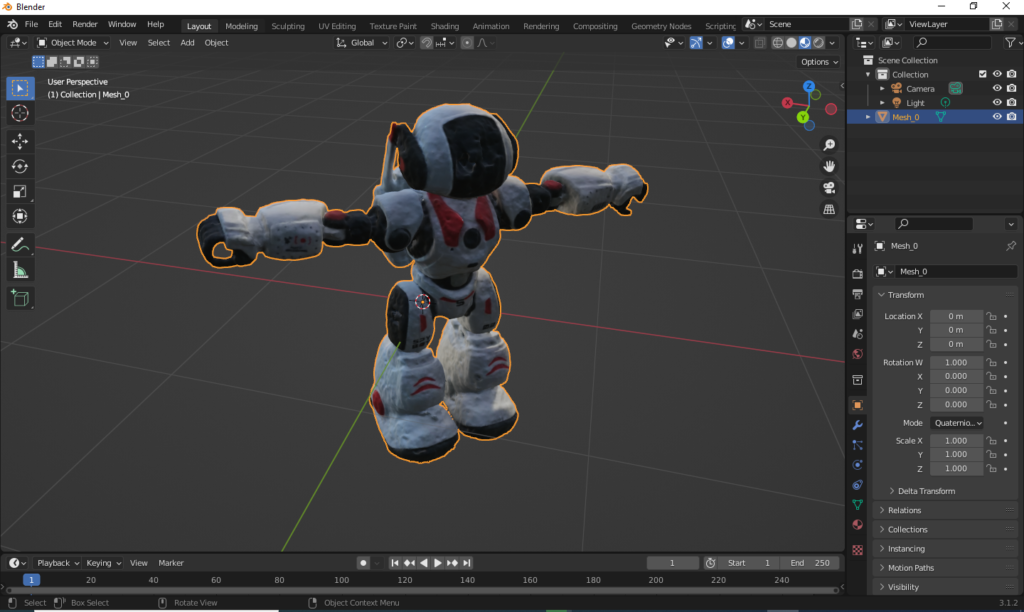
The amazing thing about NeRF renders is that they can handle light reflections and bounces in a very realistic manner. This makes it a good fit for VFX work. We can also export a textured 3D-model from the Luma AI app, but it’s not as impressive as rendering with NeRFs. It’s still quite good compared to a basic photogrammetry process, especially considering that the surface of our object was quite reflective. Here’s a screenshot from Blender:

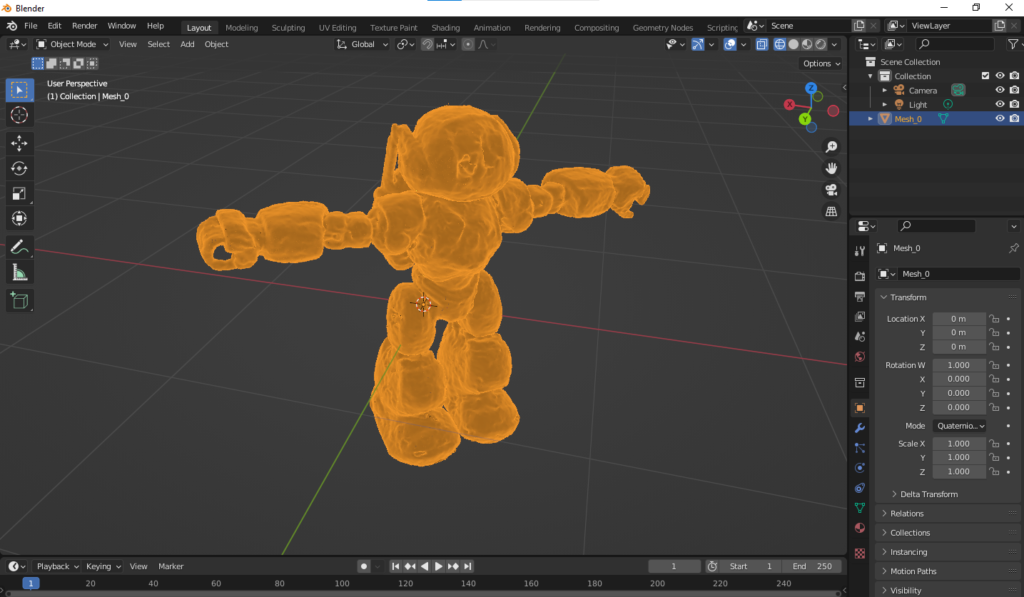
Here is how the mesh looks like (very dense):

Here’s another cool shot from a Robotime Ball Parkour toy:

@oneminutevideotutorial

Wow! NeRFs are going to be great for displaying products like this!

♬ original sound – user635578337916 –

Basics of Using Cryptomatte in Blender 2.93

In the buttons area (on the right side of the interface), select the “View layer properties” tab.

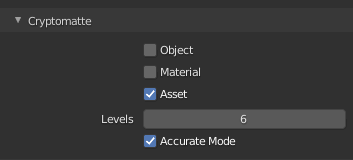
Under “cryptomatte” turn on “object”, “material” or “asset”. I like “asset” since it let’s me select entire rigs that consist of several parts.

Go to the “compositing” workspace.

Turn on “use nodes”.

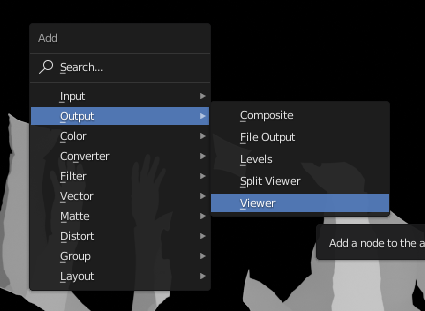
Add a viewer node with shift+a –> output –> viewer.

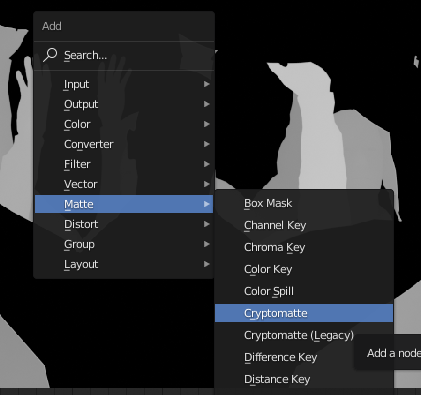
Add the cryptomatte node from Matte –> Cryptomatte.

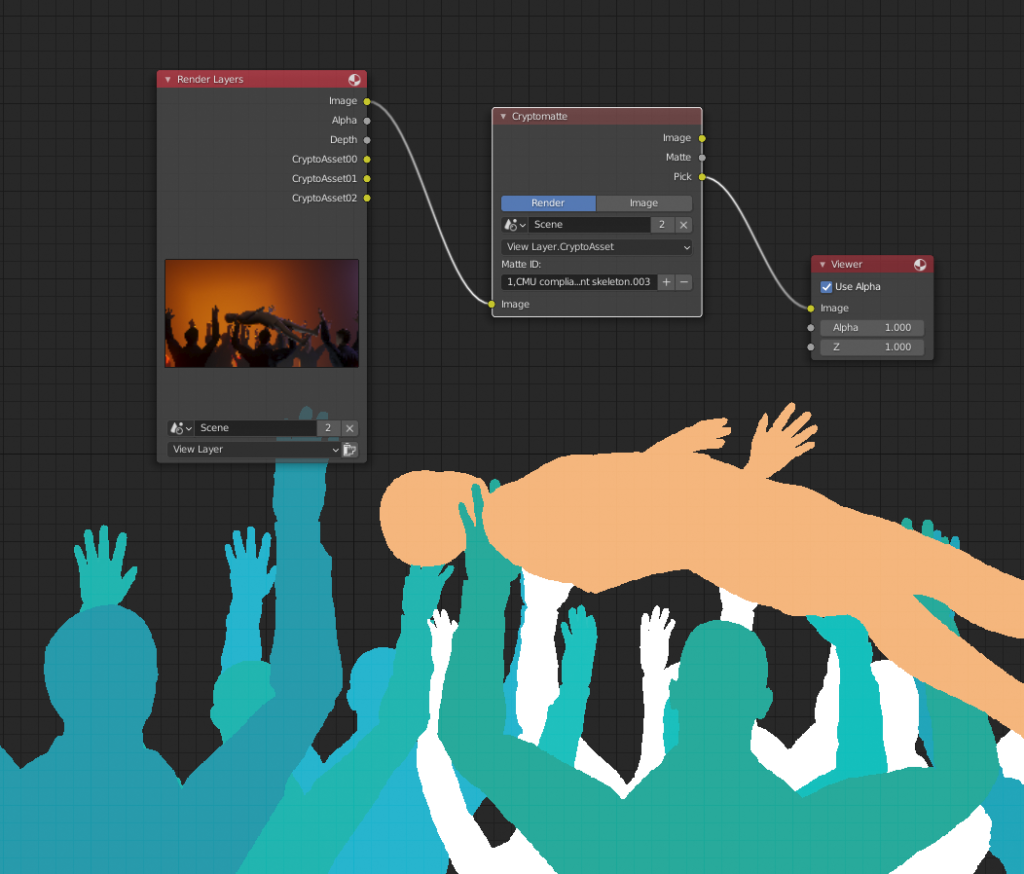
Connect the image output from the render layers node to the image input of the Cryptomatte node. Connect the “pick” output from the Cryptomatte node to the image input of the viewer node. Render the scene (keyboard shortcut F12).

You should now see different matte colors that identify different assets in your render layer. Use the + button to access the eyedropper tool and select as many assets as you need for the matte you are building.

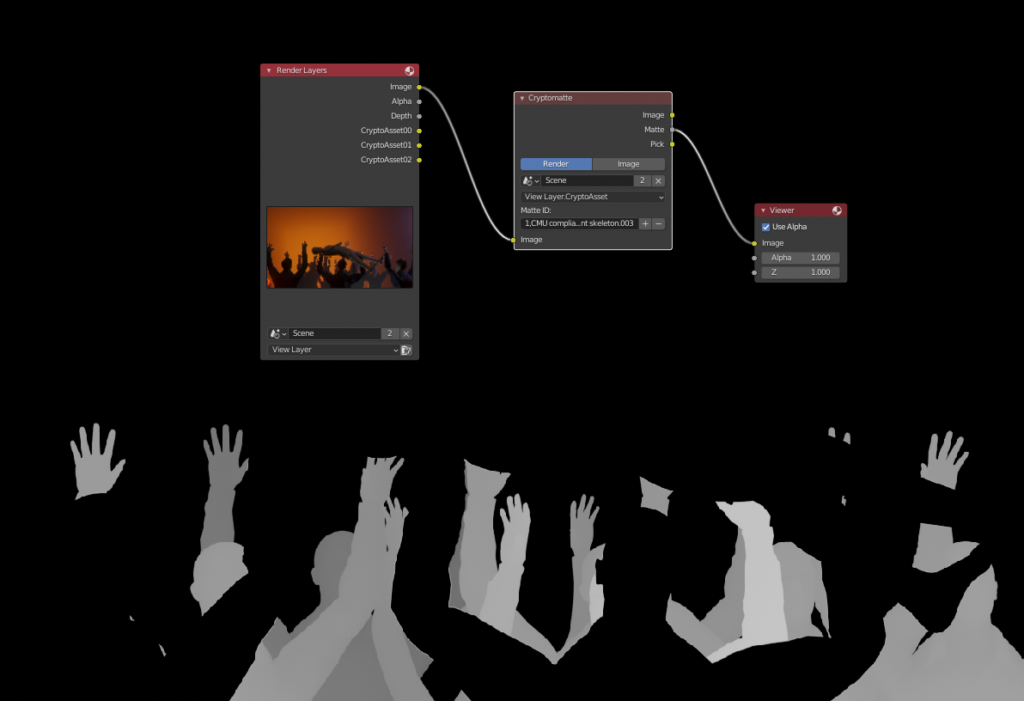
To see the actual matte, you can plug the “matte” output from the Cryptomatte node to the viewer.

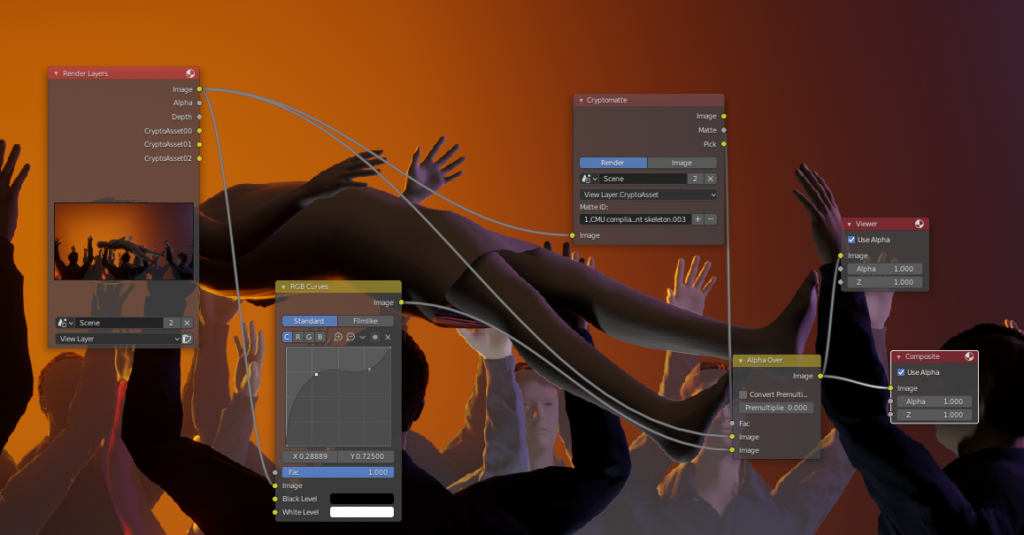
Now you have a matte that you can use in various way when you are compositing. As a simple example, you could color correct the matted area by combining two copies of the input image with the “AlphaOver” node while using the matte as the factor. Then simply drop a color correction node like RGB curves between the bottom image connection.

Hair modeling tips for Blender

I have recently been doing hair renders in Blender and thought I would share some key tips that I have learned along the way:

  1. Use multiple particle systems. If you put all your hair in just one particle system, it becomes really tedious to edit the hair. You’ll end up combing hair that you didn’t mean to etc.
  2. Place the hair manually in hair edit mode (with the add hair brush). So set the initial amount to zero in the particle settings. Comb after every round of hair.
  3. Use simple children instead of interpolated, they are much easier to handle in the edit mode.
  4. To make the interpolated children more fluffy, increase the “radius” value.
  5. Be careful with the Path –> steps value, large values made my Blender crash.
  6. Use the Hair BSDF if you are rendering with Cycles. As of now that won’t work for Eevee so you’ll need to create your own shader for Eevee.
  7. Subdivide the roots of your hair in edit mode, because the hair needs more bend right where it comes out from the head. Also use enough keys when creating the hair strands.

Dealing with a multiresolution .mov file

For the first time in my career I encountered a video file that had two different resolutions. The beginning of the video was SD resolution and after 15 frames it jumped to a resolution of 1080p. VLC player was able to correctly switch the resolution during playback and it displayed the two different resolutions also in the codec information window. But Premiere Pro didn’t understand the file properly and never switched to the higher resolution portion of it. That was a problem because I wanted to use the high resolution in my edit.

Continue reading “Dealing with a multiresolution .mov file”

How to bring materials from Quixel DDO to Blender EEVEE

Did you create some texture maps in Quixel and wanted to use them in Blender’s new EEVEE render engine? You plugged them into the principled shader but the outcome looked very different from what you had in the 3DO preview of Quixel? Maybe especially the metals looked way too dark and almost black?

Here is a simple workflow that seems to work pretty well between Quixel and EEVEE:

IN QUIXEL:

1. When you create your project, make sure you choose the metallness workflow.

2. Add your materials.

3. Export with the exporter into PNG files using the Metalness PBR (Disney) -preset.

IN EEVEE:

1. Give your object a material with the principled shader.

2. Plug in the following texture map files into the following inputs in the principled shader:

-Albedo to base color
-Metalness to metallic (set node to non-color data)
-Roughness to roughness (set node to non-color data)
-Normal to normal map node and that to the normal input (set node to non-color data)

Now your metals and other materials should look pretty close to how they looked in Quixel 3DO.