Key tips for the spin tool:
-3d cursor location will be the center point of the spin
-3d viewport orientation matters
-select the spin direction from the top bar
-hold ctrl to snap to increments

Because your time is valuable
Key tips for the spin tool:
-3d cursor location will be the center point of the spin
-3d viewport orientation matters
-select the spin direction from the top bar
-hold ctrl to snap to increments
Solid collision filtering is a really useful feature in Construct 3, but it’s not very well documented.
Continue reading “How to use solid collision filtering with Tile movement in Construct 3”I have been searching for a good workflow for testing out different color palettes for existing video game designs.
I have finally found a relatively pain free method of testing different color palettes and applying them to entire games. I will be making a video tutorial about this in the future, but before I get to that, I thought I would already explain the basics of the workflow.
Continue reading “Finally a sprite sheet recoloring process that works”Creating your own Spritefonts (sometimes also called bitmap fonts) for Scirra’s Construct 3 game engine using Photoshop can be surprisingly tricky. The main difficulty seems to be in creating a grid of evenly spaced characters so that the automatic Sprite font slicing mechanism in Construct can slice them up properly. A monospace font makes this much more simple since all the characters will take up the same space by default, but monospace fonts are quite limiting stylistically. What if you want to have non-monospaced fonts neatly organized in a grid for Construct?
There are helpful tools like “Give Your Fonts Mono” which can convert a regular font into a sprite font and it even generates the spacing data for Construct 3 which you paste into the Spritefont plugin settings. The spacing data looks typically something like this;
[[20,” “],[9,”l|”],[10,”Ii.,;:!'”],[16,”`”],[17,”[]”],[18,”j”],[20,”()”],[21,”t”],[22,”1-\”\/°”],[23,”r”],[25,”f”],[26,”*”],[31,”J”],[33,”u”],[34,”hkns”],[35,”Ldq”],[36,”bcgpz03789?”],[37,”Favy256+=$<>”],[38,”eox4~”],[40,”£”],[42,”BEP#€”],[44,”HNSTUZ_”],[45,”K”],[46,”D&”],[48,”R”],[49,”C”],[50,”VXY”],[51,”AG”],[52,”MO”],[53,”Q”],[54,”mw”],[58,”%”],[69,”W”],[70,”@”]]
You can’t however do any fancy stuff like giving your characters drop shadows, strokes or gradient fills etc. But there is a work around! Just save your tranparent png image from GYFM and open that in Photoshop. Then you can play with layer styles etc as long as you don’t cross the bounding box given for each character. You can increase the bounding box size in Give your fonts mono to give yourself more room. In Photoshop you might need to cut some of the rows into their separate layers for consistent gradients, but other than that this workflow should be pretty straightforward. When done in PS, simply re-save as PNG and import to Construct 3.
Unfortunately Construct doesn’t seem to support kerning at the moment so that would have to be handled with events. It’s not the easiest of programming challenges though.
Another possibility (besides custom events) might be to make a copy of the most difficult characters in the Spritefont sheet and give them special spacing rules. Then you would need to pick that special character in the situations in which your kerning looks bad. That’s also a bit hacky and tedious. So before Construct gets proper kerning support for Spritefonts, it might be best to stick to monospace Spritefonts.
This is a very specific topic, but it was hard to find information about it online, so I’ll post my findings here.
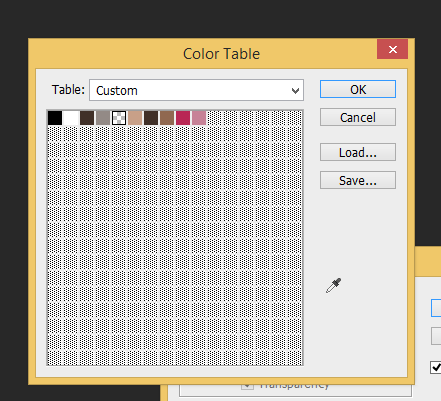
If you want to force a certain color palette on your image in Photoshop you can choose
Image –> Mode –> Indexed Color.
A window will pop up where you can choose a palette. If you want to create your own palette in which you select all the colors, you can do this:
Set the palette to “custom”. A color table window will open. You can delete existing colors by ctrl-clicking on them. You can add more colors by clicking an empty color slot and picking a color for it.

Here’s a quick gif-like video of creating custom color tables (ACT-files) in Photoshop and saving them for later use:
Thanks to 3DTudor for this quick tip that can greatly speed up your texturing workflow! It’s based on first activating the Node Wrangler addon (comes with Blender) and then hitting shift+ctrl+T. The principled shader should be selected when you hit the shortcut.
Sometimes it’s useful to see the 3d world you are creating from multiple different angles simultaneously. Many 3D programs like 3Ds Max even offer quad views that have four different angles available. In Unity you can view your scene from multiple angles in the editor by right-clicking on the scene window tab at the top and choosing “add tab” and then “scene”. You can now drag and drop this new scene window tab to a place in the interface that you prefer and change it’s view angle to your liking. One way of working could for example be to have always one top view available and next to that one free view.
Here’s how you can filter your hierarchy to find all light sources in a scene: just type in the following into the hierarchy search bar
t:Light