State of Construct 3 vs GDevelop in 2025

Construct was a groundbreaking tool for visual and intuitive code-free game making when it was originally released. Since then we have gotten into Construct version 3 and the pricing has changed to a subscription model, which is not attractive to all users. Recently there hasn’t been many major features developed for Construct and it’s development feels stalled, while the free alternative called GDevelop has been developing really rapidly. Here is an overview of the current state between the two game engines.

What GDevelop already does quite well / has achieved recently

Before diving into gaps, it’s useful to note that GDevelop has made strong progress and closed many gaps in recent versions:

  • Native 3D support (scene, lighting, models) is now built into core (rather than only via extension).
  • As of version 5.5, GDevelop now includes 3D physics (via Jolt engine)
  • Multiplayer / real-time networking support is more integrated (5.4 added multiplayer improvements)
  • Steamworks integration (achievements, matchmaking, workshop) is exposed.
  • Improved organization features like object folders, better resource unloading strategies, and QOL tweaks have been introduced.
  • Extensions / behaviors allow adding capabilities, and there is support for scripting via JavaScript blocks in event logic.
  • GDevelop remains fully open source (MIT license) for the engine/editor; the “premium” parts are about online services/builds, not core capability.

So GDevelop is no longer “just a simple 2D engine with events” — it is evolving toward a richer, more feature-complete tool.

Key areas where GDevelop is still behind (or weaker) in comparison to Construct 3

Below are frequent critiques and observed missing or less polished features (or trade-offs) when comparing to Construct 3. Some are functional gaps; others are usability, tooling, or ecosystem gaps.

Feature / areaWhere GDevelop is weaker or missingNotes / examples
Debugger / Performance profilingThe debugging / performance-monitoring experience is often cited as lacking compared to Construct’s live, fine-grained tools. Users report that Construct allows toggling individual elements, live variable inspection, breakpoints, etc., with responsive UI. In GDevelop, performance spikes are harder to trace.
Event sheet UX & advanced event toolingConstruct’s event sheets tend to be more polished: features like bookmarks, event folding, subfolders, grouping, “search events,” better event navigation, etc., are more mature. GDevelop has events, nesting, and extension mechanisms, but some users feel the UX, navigation, and large-scale event management is less smooth.
Timeline animations / cinematics / cutscenesConstruct has a built-in Timeline system for smoother animations, sequencing, easing curves, etc. GDevelop doesn’t (or didn’t at last known state) have a fully comparable, first-class timeline editor integrated. (You could build custom logic via events, but not with the same native timeline editor.)
Plugin / module ecosystem & marketplace maturityConstruct has a long-established plugin / addon ecosystem; many more mature, battle-tested third-party plugins.Because Construct has been in commercial use longer and has a stable ecosystem, many niche or platform-specific plugins are better polished. GDevelop’s extension ecosystem is growing but sometimes suffers from fragmentation, version compatibility, or lack of maturity.
Polished asset / resource management & in-editor toolingConstruct often offers tighter editor-integrated tools: e.g. sprite font styling, text effects, integrated mesh distortion, advanced effects, etc. GDevelop supports shader effects, but may not have as many built-in high-end per-asset editing tools or integrated pipelines.
Performance / runtime optimizations & memory managementConstruct’s runtime is optimized (e.g. expression compilation, tilemap optimizations, memory management) to deliver smoother performance, especially in heavier projects. GDevelop’s engine is evolving, but in projects with many objects, complex logic, or resource constraints, users sometimes see performance or memory pressure as a limiting factor.
Export / build services and platform handlingConstruct offers integrated build services (mobile, native, etc.) with smoother flows.GDevelop’s free users are limited in the number of online builds (e.g. 2 exports/day) via its build servers. But you can always export manually.
Editor polish, UX quality, collaboration, versioningConstruct has had more time to polish UI/UX, editor stability, in-editor collaboration (e.g. sharing, live preview across devices)GDevelop is improving constantly, but users sometimes note editor bugs, workflow rough edges, or less mature collaboration tooling.
Maturity of 3D toolsetWhile GDevelop now supports 3D and 3D physics, its 3D tools, lighting, advanced effects, 3D modeling import, scene graph tooling, and advanced 3D workflows are likely less mature than a mature 2D engine’s 3D “add-on” would beBecause 3D is relatively new in GDevelop, its 3D pipeline may lack many niceties, optimization paths, or extensive tooling compared to more mature 2D features.
Legacy / backward compatibility & stability in large projectsConstruct, being commercial and mature, often ensures backward compatibility and robust stability across versions; GDevelop’s rapid development sometimes introduces breaking changes or refactorsUsers sometimes report that older projects may need adaptation after engine updates.
Native code / performance-critical modulesConstruct’s core is more battle-tested, and many performance optimizations are deeply engineeredGDevelop’s engine, being open and evolving, may lag in some ultra-high-performance edge cases.
Monetization / platform SDK supportSome users note that integrations for in-app purchase, ad networks, or platform-specific SDKs in GDevelop are less polished or more cumbersome. CapterraE.g. GDPR support in ad modules, or integration of multiple ad networks, may require more manual work.
Community size, resources, documentation, tutorialsConstruct has a larger commercial user base, more polished tutorials, asset packs, plugins, community supportGDevelop is growing and has an active community, but in some niche cases, you may find fewer fully polished ready-made tutorials or plugins.

Summary & perspective

  • GDevelop has closed many past gaps, especially with the addition of native 3D, physics, multiplayer, better asset unloading, object organization, etc.
  • The remaining differences are less about “can’t do” features and more about the polish, stability, tooling UX, debugging power, plugin ecosystem maturity, editor refinements, and performance visibility.
  • In many cases you can build with GDevelop what you could with Construct, but you might invest more effort on tooling, debugging, or workarounds.

Automating the import of hundreds of sprites to Construct

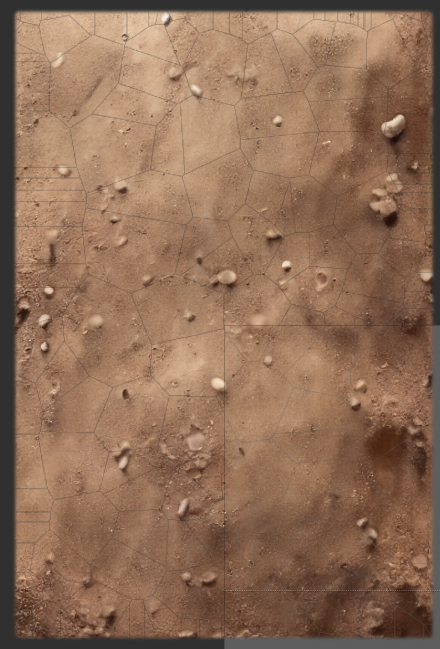
I’m making a game where an area of ground is broken piece by piece. I managed to create a python script that uses a voronoi pattern to shatter my image into several small irregular pieces. Here’s how that looked:

I then needed to import those 200 pieces into Construct. I figured out that if I set the position of each piece to 0,0, they would form the full image perfectly. After that I can just crop the pieces to their actual pixels and things work really nicely: the voronoi jigsaw puzzle comes together like it should.

The only pain point I had left was importing 200 sprites one by one into Construct. I knew that I could drag them all at the same time on top of Construct, which would create an animation. But I needed to create several individual sprites instead of animation frames.

The real life saver in this situation turned out to be the Project Folder feature in Construct (works best in Chrome), since it gives direct access to the project file structure. So here are the steps I performed and the scripts I used:

Please don’t attempt this with your production code, instead start a new empty Construct project and save it as a Project Folder on your local hard disk

1. Use a Python script to loop through all the image files in a folder and have it generate the JSON files Construct expects to have in the objectTypes folder. Here is the script for that (zipped due to security considerations). To run that, just unzip, place it in the same folder with the images, open a terminal there and type: python generateProjectJSON.py and hit enter. A bunch of JSON files should appear which you should copy to your Project Folder’s objectTypes folder.

2. Next the project.c3proj file needed to have the files listed in the items array in this manner:

“objectTypes”: {
“items”: [
“myImage_0”,
“myImage_1”,
“myImage_2”
],

So made a script to generate the array. Note that this is a very simple script and could be improved to support more files name conventions. At the moment it is just adding an incrementing number at the end of each image name. This script will output a simple array in a file called names.txt. Copy the array to your project.c3proj file.

3. The images needed to be renamed with -default-000.png appended to their file name. Time for another script, run this similarly in the folder with the images. After that I copied the images into the images folder inside the Project Folder.

4. That’s basically it but I also wanted the sprites already placed in the layout at coordinates 0,0 so I wrote one more script to do that. Run this script where you have your JSON files (that we generated earlier) and it will give you a new file called new_layout.json. Take the “instances” array from the generated file and merge it with your Layout 1.json file (which can be found in the layouts folder).

Now just reload the project and something magical happens: all your images will appear in the project and in the layout! Even if it’s hundreds or even thousands of images.

So there we have it. This workflow is obviously not useful if you just need to import a small number of sprites. But if you needs hundreds, then this can definitely save you some frustrating manual labor.

Gamepad not working on a Mac?

Many people are reporting issues with various gamepads/game controllers and Macs. I was able to get a USB gamepad to work on my MacBook Pro (running MacOS Monterey) by installing (from the App store) a tool called Gamepad Mapper. Then I simply mapped the x-axis (which didn’t work at first) to keyboard keys (which my game also supports). I also had to allow this software in the security settings (accessibility submenu).

Now my Retro-bit NES USB controller works just fine with my Construct 3 video game. Check out the game King David RPG here:

https://ecation.itch.io/king-david-rpg

Basics of working with timelines in Scirra Construct 3

Construct 3 has received a long-awaited feature when the Timelines got introduce a few years back. They have been built to be incredibly powerful, but getting started with timeline animation in Construct can feel confusing even for professional animators who are very familiar with concepts like keyframes and eases.

Here are the basic steps you should perform when you want to use the Timeline to create a rotation for an object:

-Right click somewhere in the layout editor and choose Timeline -new timeline

-Drag and drop an instance to the timeline

-Turn on editing (the pen icon)

-Select the instance and change it’s angle value in the properties bar

-Record this change as a keyframe by clicking on the + button to set keyframes

Here’s a few other tips:

-If you want to open the Timeline properties like the name of the Timeline, you need to click on the headers for things like the timeline name or a specific track. Then they will open up in the properties bar. Simply clicking on the Timeline bar itself is not enough.

-If you want to access the Timeline with events, you need to add the global timeline object to the project.

-You can zoom the timeline by scrolling while holding down ctrl

-To change the value of an existing keyframe, you don’t click “set keyframe” as in many other animation programs, but instead change the value, right click on the keyframe and choose “update”.

You can set any instance to play with the timeline using the “Set instance” action. Very handy for giving different objects the same animation.

One way of uniquely identifying a timeline is to give them a unique tag, possibly based on the UID of the instance involved.

If you want to do something with the instance you play with a timeline, one easy option for that is using the “system –> wait for previous actions to complete” action, which will wait for the timeline to finish and allow you to operate on the instance right after that.

One really powerful feature is the ability to add tags to master keyframes (the round ones). These tags can then be used to trigger various events in order to make things happen in sync with your animation.

Construct 3 Rotation Angles Reference

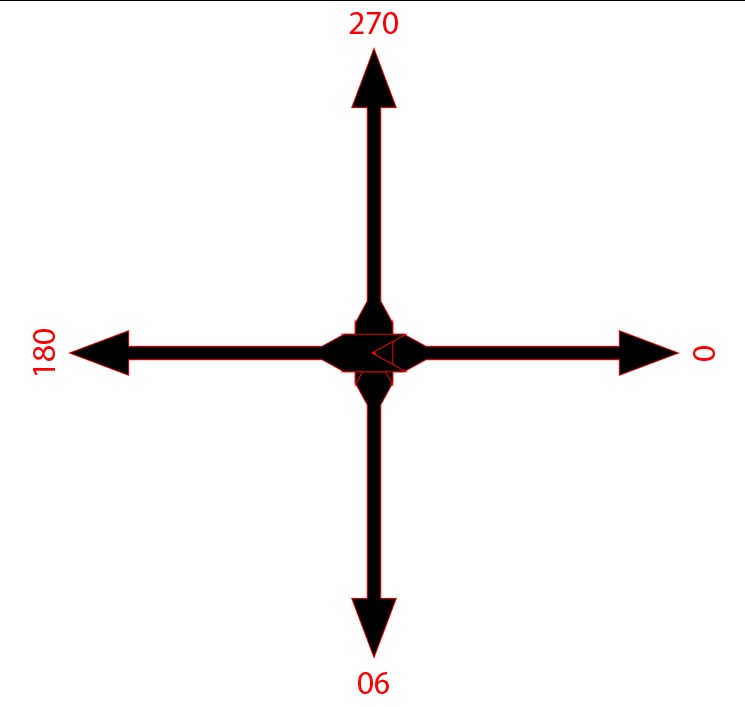
If you have trouble remembering how Construct 3 calculates rotation angles, here is a quick chart for you. Note that movingAngles (which I believe are directional vectors) use a different coordinate system in which values can be also negative.

If you want to to make the movingAngle of the moveTo behavior change the animation of a character to left or right, one option is to do this:

  • System: (bird.MoveTo.MovingAngle+360)%360 within 88 degrees of 180
    -> bird: Set animation to “flyLeft” (play from current frame)
  • Else
    ->bird: Set animation to “flyRight” (play from current frame)

The (angle+360)%360 expression converts the values to a range of 0-360 and then we can simply check if we are within a certain degree of 180 which points left and if that’s true we set the animation to the left one.

Finally a sprite sheet recoloring process that works

I have been searching for a good workflow for testing out different color palettes for existing video game designs.

I have finally found a relatively pain free method of testing different color palettes and applying them to entire games. I will be making a video tutorial about this in the future, but before I get to that, I thought I would already explain the basics of the workflow.

Continue reading “Finally a sprite sheet recoloring process that works”

Construct 3 Spritefonts with Photoshop

Creating your own Spritefonts (sometimes also called bitmap fonts) for Scirra’s Construct 3 game engine using Photoshop can be surprisingly tricky. The main difficulty seems to be in creating a grid of evenly spaced characters so that the automatic Sprite font slicing mechanism in Construct can slice them up properly. A monospace font makes this much more simple since all the characters will take up the same space by default, but monospace fonts are quite limiting stylistically. What if you want to have non-monospaced fonts neatly organized in a grid for Construct?

There are helpful tools like “Give Your Fonts Mono” which can convert a regular font into a sprite font and it even generates the spacing data for Construct 3 which you paste into the Spritefont plugin settings. The spacing data looks typically something like this;

[[20,” “],[9,”l|”],[10,”Ii.,;:!'”],[16,”`”],[17,”[]”],[18,”j”],[20,”()”],[21,”t”],[22,”1-\”\/°”],[23,”r”],[25,”f”],[26,”*”],[31,”J”],[33,”u”],[34,”hkns”],[35,”Ldq”],[36,”bcgpz03789?”],[37,”Favy256+=$<>”],[38,”eox4~”],[40,”£”],[42,”BEP#€”],[44,”HNSTUZ_”],[45,”K”],[46,”D&”],[48,”R”],[49,”C”],[50,”VXY”],[51,”AG”],[52,”MO”],[53,”Q”],[54,”mw”],[58,”%”],[69,”W”],[70,”@”]]

You can’t however do any fancy stuff like giving your characters drop shadows, strokes or gradient fills etc. But there is a work around! Just save your tranparent png image from GYFM and open that in Photoshop. Then you can play with layer styles etc as long as you don’t cross the bounding box given for each character. You can increase the bounding box size in Give your fonts mono to give yourself more room. In Photoshop you might need to cut some of the rows into their separate layers for consistent gradients, but other than that this workflow should be pretty straightforward. When done in PS, simply re-save as PNG and import to Construct 3.

Unfortunately Construct doesn’t seem to support kerning at the moment so that would have to be handled with events. It’s not the easiest of programming challenges though.

Another possibility (besides custom events) might be to make a copy of the most difficult characters in the Spritefont sheet and give them special spacing rules. Then you would need to pick that special character in the situations in which your kerning looks bad. That’s also a bit hacky and tedious. So before Construct gets proper kerning support for Spritefonts, it might be best to stick to monospace Spritefonts.

Run a simple lightweight Python server

When you are developing websites you often run into the need to test them on a server environment, because browsers block websites with certain features from running locally.

Here is a really quick way to run such a website in a server environment using Python 3 (which you probably have already installed on your machine anyways).

  1. Open the command window where your website root folder is. One easy way of doing that is simply typing “cmd” in the Windows Explorer address bar.
  2. Type this command in the command window:
python -m http.server 8000
  1. Now simply go to http://127.0.0.1:8000/ in your browser.

If you are getting errors regarding script files with that simple version, you can also try this longer code:

python
#Use to create local host
import http.server
import socketserver

PORT = 1337

Handler = http.server.SimpleHTTPRequestHandler
Handler.extensions_map.update({
      ".js": "application/javascript",
});

httpd = socketserver.TCPServer(("", PORT), Handler)
httpd.serve_forever()

And open that with:

http://127.0.0.1:1337/