Corrective shape keys for meshes transformed by armatures

Sometimes it might be handy to use shape keys in order to smooth out problematic bone driven distortions in a mesh.

The trouble is that when you try to edit a shape key, the mesh will jump into edit mode without the armature distortion taken into account.

The solution is really simple: select the mesh, go to it’s modifiers tab and activate the “display modifier in edit mode” for the armature modifier! Now you can see the deformed mesh in edit mode which makes creating corrective shape keys much easier!

Relative output file paths in Blender

Rendering animations can take a lot of time, so often you want to do it using several computers. So you prepare your scene and save your .blend file and copy it to another computer for rendering purposes. But when you start rendering, you might quickly notice that the output file path is not working, because by default Blender will write absolute paths which will not work on a computer with a different user name.

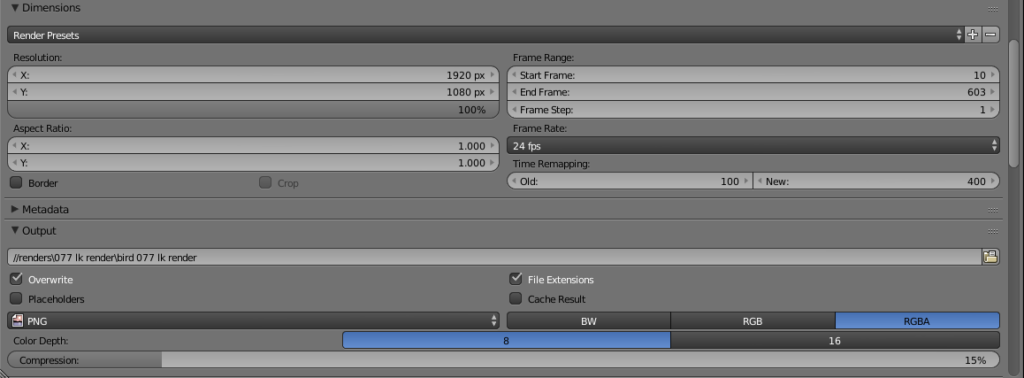
The solution is to use relative output file paths. It’s as simple as starting the output file path with two forwards slashes like this: //

So if you want to have all your renders go next to your .blend file in a folder called “renders” and in a subfolder named based on say your current file name, it would look something like this:

//renders\version72\

Here’s a screenshot of my current project and it’s file output field:

This will make rendering the same blender-file on different computers much less of a headache!

Toggle between material viewport shading in Blender

Are you frustrated how tedious it is to switch between the “material” viewport shading mode and other modes like wireframe?

Here’s how you can add a keyboard shortcut to allow quick toggling to the material shading.

Steps:
1. Open up file –> user preferences –>input
2. Open 3d view and then 3d view (global)
3. Scroll down and click “add new”
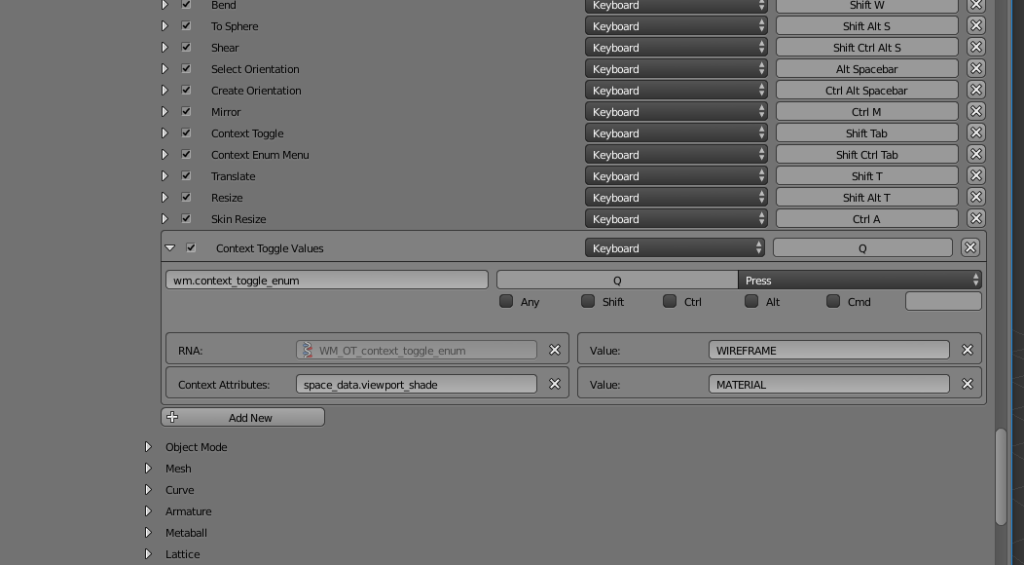
4. Type wm.context_toggle_enum to the identifier field
5. Type space_data.viewport_shade to the context string field
6. Type WIREFRAME to the upper value field
7. Type MATERIAL to the lower value field
8. Set the keyboard shortcut you desire by clicking on the “press a key” button, in our case we chose Q

Below is a screenshot of the finished settings:

Enabling Microdisplacements/Adaptive subdivision in Blender

Here are the steps for testing out the new microdisplacement possibilities in Blender:

1. Switch to Cycles render engine
2. Go to user preferences –> system –> enable opensubdiv compute (choose CPU as the compute device unless you have a good graphics card)
3. Set feature set to “Experimental” (on top of the render settings)
4. Add a subdivision surface modifier to the default cube and check “use opensubdiv” and “adaptive”
5. Add a material to the cube and set it’s displacement to “true” instead of “bump”
6. Go to the node editor, add a noise texture and connect it to displacement
7. Control the intensity of the displacement by adding a math node in between and setting it to multiply
8. Turn on preview rendering (in viewport shading). You might need to tab between edit and object mode sometimes to refresh the preview.